Build a RAG App with a UI and Private Data on AWS
How to build a RAG with a UI, using AWS Bedrock, AWS Lambda and Streamlit in 10 minutes
Published by Carlo van Wyk on August 25, 2024 in AWS
Here's how to build a RAG app with a sleek GPT-like chat interface to query your own private data, securely.
Here's an example of the RAG UI that we'll build in this post:
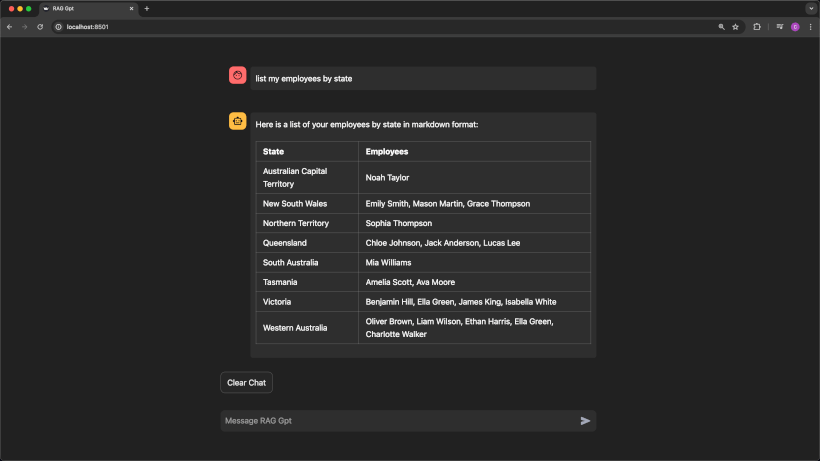
All this runs on AWS for about a dollar a month with moderate usage.

This RAG stack is built using AWS Bedrock, AWS Lambda, Pinecone as a database, and Streamlit for the UI.
Ok, so what's a RAG you might ask?
RAG stands for Retrieval-Augmented Generation.
The R, or retrieval bit means that you query your own private knowledge base, which in this case is a bunch of text documents on AWS S3.
Then this information is used to Augment, or to provide context to an LLM when you write a prompt. This is the A part in a RAG.
And finally, you have generation, which means your LLM, which could be any LLM model like ChatGPT, LLama3 or Claude, which uses the augmented input or context to generate responses relevant to your private data.
How AWS Bedrock and the knowledge base all fits together
Documents will be stored in AWS S3, and the vector embeddings will be stored in Pinecone which is a hosted vector database you can use for free.
First, let's build the knowledge base using AWS Bedrock. AWS Bedrock is like an orchestrator that acts between AWS S3 as the data source, Pinecone, the embeddings model which converts text to embeddings, and the LLM which is Claude Haiku.
Here's how AWS Bedrock knowledge base works.
You store your private data in text files on AWS S3.
Then AWS Bedrock processes these text documents by using an embedding model like the Titan Text Embeddings model, and what this embedding model does is it creates embeddings for sections of text.
Each section of text will be converted to an array of numbers which represents that section.
For instance, the words cat and kitten could each be stored as arrays of numbers that are very close to each other in a mathematical sense, and Pinecone organises and stores data in a way that it can quickly find similar embeddings when you search for a term.
Once these embeddings have been created, they are stored in Pinecone. If you query your data using the AWS Bedrock UI, Bedrock will first query Pinecone to get results which will be returned in text format, and then it will augment your prompt with these results, and an LLM like Claude Haiku will be used for your prompt which will include your augmented private data.
So let's build the AWS Bedrock Knowledge base.
AWS Bedrock Knowledge Base Setup Step 1: AWS S3 Bucket
The first step is to create an AWS S3 bucket. This is where we'll store our private data.
Go to the AWS S3 console.
Then click Create Bucket, give it a name, and click the create bucket button at the bottom of the page.
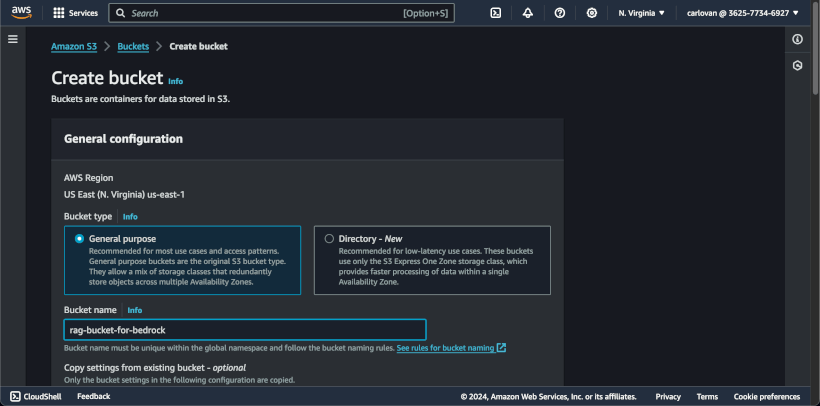
Then search for your bucket, click on the bucket, and under the properties tab, copy the ARN for the bucket, because this will be needed later.

AWS Bedrock Knowledge Base Setup Step 2: Set up Pinecone
The second step is to sign up on Pinecone.
Click create index, and give your index a name.
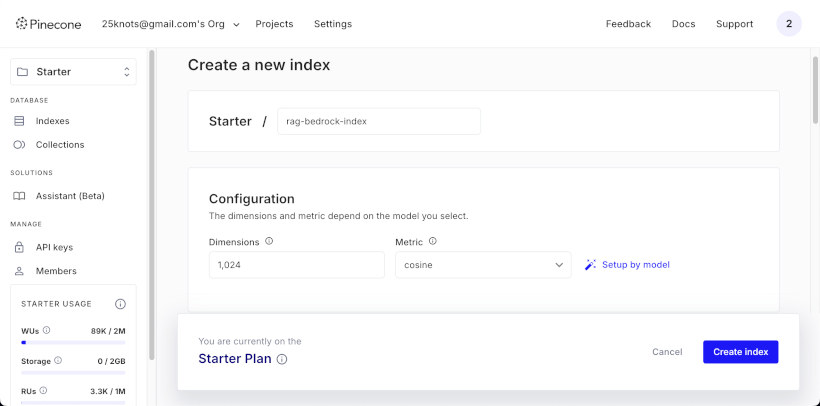
Enter 1024 under dimensions and select cosine as the metric.
Under cloud provider, select AWS, and choose your region.
Then, copy the host value for later usage.

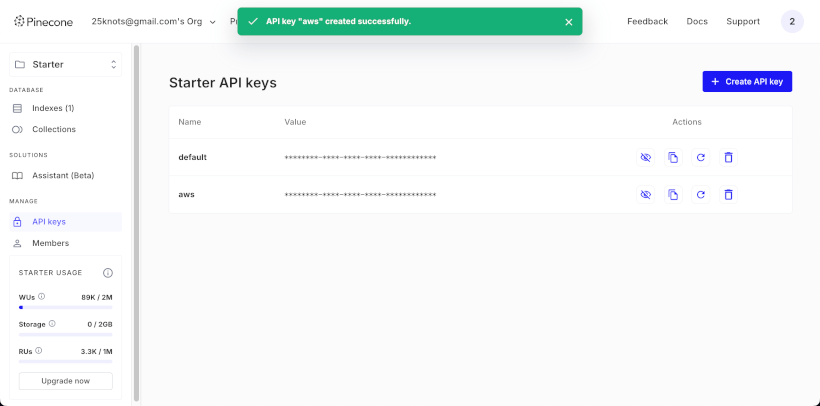
Next, create an API key.
Click on API keys and create a new API Key by clicking Create API key.
Then copy the API key because it will be needed in the next steps.
AWS Bedrock Knowledge Base Setup Step 3: Create an AWS Secrets Manager Secret for the Pinecone API Key
The third step is to create an AWS Secrets manager secret to store the Pinecone API key.
AWS Bedrock needs an AWS Secret for the Pinecone integration.
Open the AWS Secrets Manager console.
Then, click the store a new secret button.
Under secret type, select other type of secret
And under key/value, enter apiKey as the key.
The key has to be apiKey cause that's the key that AWS Bedrock will be looking for.
Paste the value of the pinecone API key you created earlier.
Then click next, and under secret name, give it a name.
Once the secret is created, go to your secret and copy the secret ARN.
AWS Bedrock Knowledge Base Setup Step 4: Create an AWS Bedrock Knowledge Base
Go to the AWS Bedrock console.
Then, click the Get Started button.
In the left hand pane, under Builder Tools, click Knowledge Bases.
Then, click Create Knowledge Base.
Give the knowledge base a name.
Under IAM, select Create and use a new service role.
Give the IAM role a name.
Under choose data source, ensure that Amazon S3 is selected, then click Next
Fill in a name under data source name.
Under S3 Uri, I'll click browse S3.
Then I'll select the bucket you created earlier and click next.
Under Embeddings Model, select Titan Text Embeddings V2
Note that the value of vector dimensions should be used as the value for vector dimensions when you set up the Pinecone database.
Under Vector Database, if you choose the Opensearch serverless vector store, it's going to cost a bit of money, so choose the Choose a vector store you have created option, and then select the Pinecone option.
Then check the checbox to agree to the terms of service.
For the endpoint, paste the pinecone endpoint url you copied earlier when you created the Pinecone database.
For AWS Bedrock to connect to Pinecone, it needs to read the API key from an AWS Secrets Manager secret.
So paste the ARN of the secret you created earlier.
Then under Metadata field mapping, enter text under Text field name.
For the metadata field, enter metadata.
Then click next, and click Create knowledge base.
AWS Bedrock Knowledge Base Setup Step 5: Upload files to S3 Bucket
It's finally time to upload your private data into your S3 bucket, so go ahead and do that on the S3 console.
Then on the Knowledge Base page of your AWS Bedrock console, select your data source and click Sync.
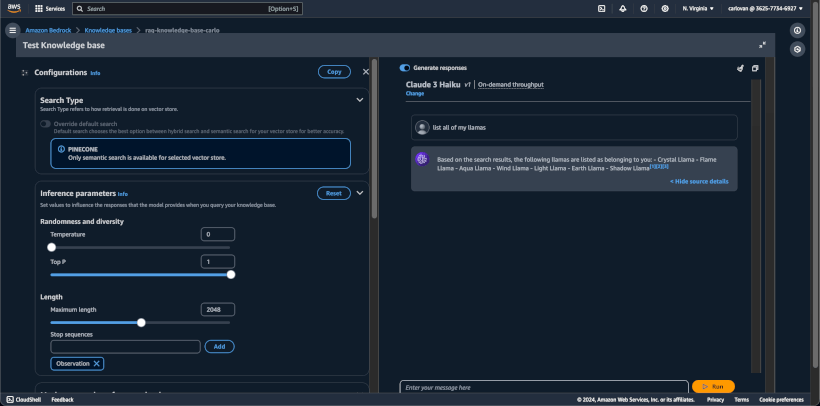
AWS Bedrock Knowledge Base Setup Step 6: Query your Data on AWS Bedrock
After the sync completes, click select model in the right hand pane, and choose Claude 3 Haiku.
Then ask it some questions.
Build an API to interact with AWS Bedrock using AWS Lambda
Now that you have a working RAG on AWS, let's create an AWS Lambda which will query AWS Bedrock and return data.
The Lambda will essentially be an API for the UI. It will accept POST requests with a prompt property in the payload and return results from AWS Bedrock.
- We'll invoke the Lambda with a POST request.
- And the Lambda will in turn invoke the AWS Bedrock API, using the RetrieveAndGenerate command.
- What this command does is it will convert the prompt into a vector embedding using the Titan Text Embeddings model, and then pass that vector embeddings to Pinecone. Pinecone will then use that vector embeddings to query for closely matched embeddings and return results in text back to AWS Bedrock.
- And finally, AWS Bedrock will take the text results it received from Pinecone, and augment the prompt with this information as context, and query the Claude Haiku LLM.
- The results are then returned to the Lambda.
To create a skeleton AWS Lambda, go to the AWS Lambda console and then click create function.
Make sure Author from scratch is selected, and give the function a name.
For runtime, select Python, and leave the Architecture as x86.
Under advanced settings, check Enable function url. This is needed in order to invoke our Lambda over HTTPS.
Under Auth type, select NONE, and click Create function.
Next, invoke the lambda from the Test tab with an empty payload.
{}
Now that we have a basic Lambda set up, let's head over to Visual Studio Code and create a Lambda that will query the RAG using AWS bedrock's API.
In VS Code, create a new index.py as shown below.
import json
import os

import boto3
from botocore.exceptions import ClientError


def handler(event, context):
    try:
        parsed_body = json.loads(event["body"])

        prompt = parsed_body.get("prompt")

        client = boto3.client("bedrock-agent-runtime")

        retrieve_and_generate_command = {
            "input": {"text": prompt},
            "retrieveAndGenerateConfiguration": {
                "type": "KNOWLEDGE_BASE",
                "knowledgeBaseConfiguration": {
                    "knowledgeBaseId": os.getenv("KNOWLEDGE_BASE_ID"),
                    "modelArn": "arn:aws:bedrock:us-east-1::foundation-model/anthropic.claude-3-haiku-20240307-v1:0",
                },
            },
        }

        response = client.retrieve_and_generate(**retrieve_and_generate_command)

        return {
            "statusCode": 200,
            "body": json.dumps(
                {"text": response.get("output", {}).get("text", "no response")}
            ),
        }
    except ClientError as error:
        return {
            "statusCode": 500,
            "body": json.dumps({"error": str(error)}),
        }
Do deploy this, zip the index.py along with all the folders inside the site_packages folder so that you can update the lambda with this deployment package.
To do this, go to the code tab and click the upload from button and select upload, and then select the zipped deploy file.
Under runtime settings, click edit and change the handler to index.handler, since both the filename and function name changed compared to the default lambda's filename and handler.
Since Lambdas have a default timeout of 3 seconds, increase this timeout by clicking the configuration tab, general configuration, then edit and
change the timeout to 30 seconds and click save.
Then, to set the KNOWLEDGE_BASE_ID as an environment variable, click environment variables, then edit and click add environment variable.
Give the key a name of KNOWLEDGE_BASE_ID, and the value should be the value of your Knowledge Base Id in your Bedrock Knowledge Base detail page.
Once this is all done, head back to the Lambda's test tab, and if you invoke the Lambda, you'll get an AccessDeniedException error.
This is because the Lambda doesn't have permissions to invoke AWS bedrock.
Copy the IAM role name that is listed in the error, then go to the IAM console, and click on that IAM role.
Under Permissions policies, I'll click Create inline policy, and then click on JSON
Then add this inline policy, which will give your Lambda the necesarry permissions to invoke AWS Bedrock.
{
  "Version": "2012-10-17",
  "Statement": [
    {
      "Action": [
        "bedrock:InvokeModel",
        "bedrock:Retrieve",
        "bedrock:RetrieveAndGenerate"
      ],
      "Resource": "*",
      "Effect": "Allow"
    }
  ]
}
Then click next, give it a policy name and click create policy.
Back on the Lambda's test tab, click the test button again to invoke the lambda with the same payload again.
To invoke the Lambda with Postman, you can make a POST request to your Lambda via Postman.
First, get the Lambda's function url by clicking on Configuration and then on Function Url.
Then, in Postman, make a new POST request to your function's endpoint, with a sample payload:
{
  "prompt": "your prompt goes here"
}
Now that the Lambda is functioning as an API, let's build a sleek ChatGPT UI, so that we can use it to chat with our own private RAG.
Building a RAG UI with Streamlit
For the frontend, we'll use Streamlit, which is a Python library that allows you build UIs with minimal code.
Here's the code, which I'll explain below.
import streamlit as st
from invoke_lambda import invoke_lambda
from load_css import load_css

# Initialize session state for chat history
if "chat_history" not in st.session_state:
    st.session_state.chat_history = []


def clear_chat():
    st.session_state.chat_history = []


def main():
    st.set_page_config(page_title="RAG Gpt", layout="centered")

    st.markdown(load_css("style.css"), unsafe_allow_html=True)

    # Display chat history
    for message in st.session_state.chat_history:
        message_style = (
            "user-message" if message["role"] == "user" else "assistant-message"
        )
        with st.chat_message(message["role"]):
            st.markdown(
                f'<div class="{message_style}">{message["content"]}</div>',
                unsafe_allow_html=True,
            )

    # Text input for user
    if user_input := st.chat_input("Message RAG Gpt"):
        # Append user message to chat history
        st.session_state.chat_history.append({"role": "user", "content": user_input})

        # Show user message in chat
        with st.chat_message("user"):
            st.markdown(
                f'<div class="user-message">{user_input}</div>',
                unsafe_allow_html=True,
            )

        # Create a placeholder for the bot's response
        bot_message_placeholder = st.empty()

        with st.spinner("Thinking..."):
            bot_response = invoke_lambda(user_input)

        # Update the placeholder with the bot's response within the chat message context
        with bot_message_placeholder.container():
            st.chat_message("assistant").markdown(
                f'<div class="assistant-message">{bot_response}</div>',
                unsafe_allow_html=True,
            )

        # Append bot response to chat history
        st.session_state.chat_history.append(
            {"role": "assistant", "content": bot_response}
        )

    # "Clear Chat" button when there are messages in the chat history
    if st.session_state.chat_history:
        st.button(
            "Clear Chat",
            on_click=clear_chat,
            key="clear_chat_button",
            help="Clear the chat and start a new one",
            use_container_width=False,
        )


if __name__ == "__main__":
    main()
Since we're dealing with private data here, we don't want to expose our data to the public on a public API.
There's 2 options here: The most secure option would be to put API gateway in front of the Lambda. And you can configure API keys with API gateway along with IP Address restrictions.
The easier way to do this would be to add an API Key as an environment variable, and then validate for an AUTHORIZATION header in the POST request.
Here's how to add an Authorization check to the Lambda:
auth_token = os.getenv("AUTH_TOKEN")

    authorization_header = event["headers"].get("Authorization") or event[
        "headers"
    ].get("authorization")

    if not authorization_header or authorization_header != f"Bearer {auth_token}":
        print("Unauthorized request")
        return {
            "statusCode": 403,
            "body": json.dumps({"error": "Forbidden"}),
        }
Code
Clone the Github repository: https://github.com/thecarlo/rag-with-ui-streamlit-aws-bedrock